
This step by step guide aims to simplify what to deliver a Sound Designer including both the audio and video delivery requirements that most sound designers will request before they can start working on your film, trailer, or show.
What To Deliver To Sound Designers?
Step 1: How To Prepping Your Session While Editing
When a Sound Designer receives your film, the first thing we’ll do is organise the session in our DAWs (Digital Audio Workstation). Having a neatly organised session before you package the project up is crucial in guaranteeing that nothing gets missed and you receive the soundtrack you are looking for.
While you are editing your film, making all of the creative decisions on music and temp sound effects, try to keep all of your sound elements organized and separate. Place your raw dialogue (DX), ADR, Production Effects (PFX), Sound Effects (FX) and Music (MX), & Effected Dialogue (Futz) on separate tracks so we can quickly move all of these elements into our template and start working on your film.
Quick Editing Tips:
- Never delete alternative microphone options, we often use these when making editing decisions.
- Make sure your dialogue and music is synced
- Production Effects (PFX) are effects that were recorded on set, unlike Sound Effects (FX) which are added in post.
Step 2: Exporting & Delivering Audio Assets
There are two types of Audio Assets that you’ll need to prep in order to give your sound team the best tools for success, the sound dailies and the picture locked timeline.
The sound dailies is everything that was recorded on set organised by scene, take, shot, wild lines, and PFX (Production Effects). This is an incredibly useful resource to have access as it allows us to find alternate takes, words & syllables to smooth out transitions. It also allows us to have access to any metadata and documents that the location sound recordist should have provided, which helps us navigate the folder easier.
Once your film is complete (this can be pre-colour grading or visual effects) and you are ready to send it to a Sound Designer it is time to do prep your timeline for export.
- Make sure your video starts at 01:00:00:00 (unless distribution says otherwise, sometimes you’ll see 10:00:00:00 requested).
- Place a 1kHz 1-frame sine wave 2 seconds before the 1st frame of the video (00:59:58:00), this is called a two pop.
- Place the same 1kHz 1-frame sine wave 2 seconds after the last frame of your video, this is called a tail pop.
The two pop and tail pop are used to set and verify sync when the film is transferred between various stages of production.
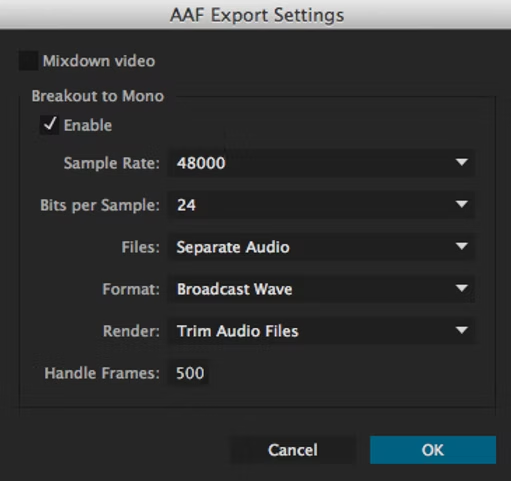
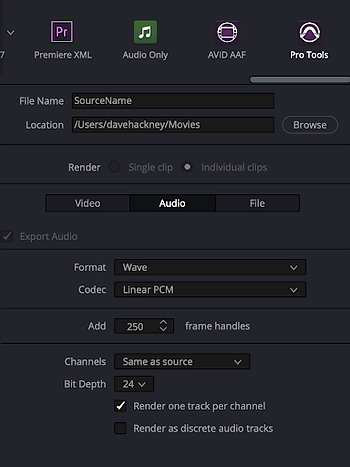
Next navigate to your software’s AAF/OMF export window, and select the following settings:
- File Format: AAF with Embedded Audio (do not embed video)
- Audio File Format: WAV
- Bit Depth: 24 Bit
- Sample Rate: 48kHz
- Audio Handles: Minimum of 240 frames
Premiere Pro (AAF Export Settings)
Davinci Resolve (AAF Export Settings)
The AAF will allow the sound team to open your audio timeline in any digital audio workstation (DAW). We will be able to see clip gain, volume automation, track names, and how you organised your session. Remember, the better organised your session, the more time your Sound Designers will have to be creative working on your mix.
Step 3: Exporting & Delivering Video Assets
Before you can export your video it is important to add a timecode burn overtop of your video. The timecode burn is typically burned at the bottom center of the video, but it is better to place it in the top right with a transparent black letterbox. A lot of action happens at the bottom of the frame such as footsteps, foley, etc and it is helpful to not have the bottom of the frame obstructed.

Now, before you can export your video pan all of your production tracks include your dialogue and production FX hard right, and all of your temp effects and music hard left, then Navigate to your software’s video export window and select the following settings.
- Video Format: MOV
- Video Codec: H.264
- Video Frame Rate: Matching that of your video master
- Resolution: Up to 1920 x 1080Key-frames each 12 frames, P and B frames: Disabled
- Automatic Key-frames: Disabled
- Audio: Linear PCM/WAV in Stereo L/R
Step 4: Delivery
You are now done. You can now upload all of the assets to an online storage platform of your choosing. We recommend using Google Drive but anything will work as long as we have access to the files throughout the production.
Now you know what to deliver a Sound Designer.


